|
|

Multiboot computer system
|
Since at least 20 years, I use on my workstation computers a multiboot configuration on internal storage device, regardless if they are desktops or laptops. This means I install multiple operating systems on the hardware, each of them can run as host OS (one at the time). My configuration is made with the intention of having each OS in a separate partition and the boot manager to be independent of the operating systems. In that way, a crash of an OS will not affect the others.
|

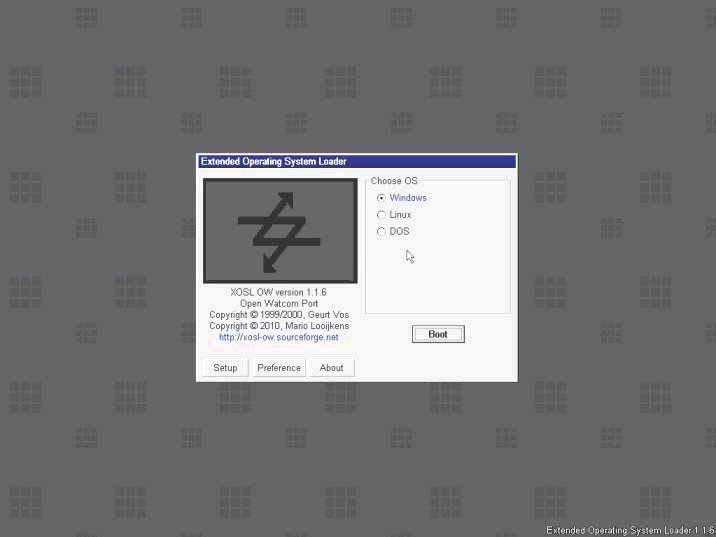
Figure 1
Boot manager |

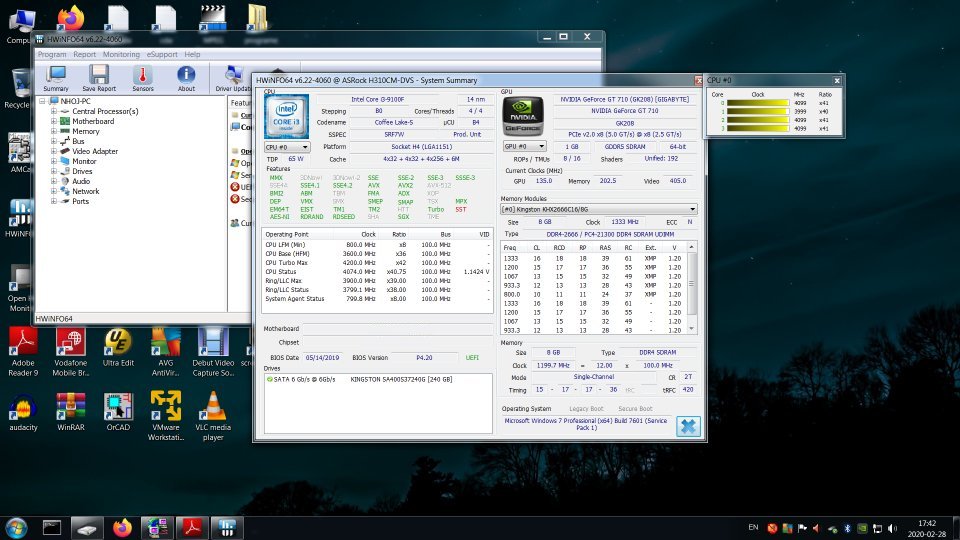
Figure 2
Windows |

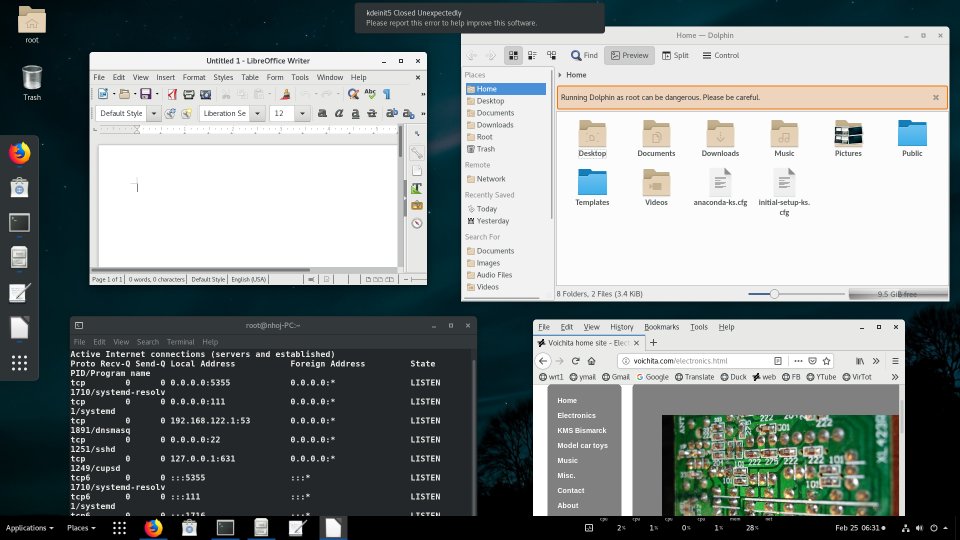
Figure 3
Linux |
|
The simplest way to run an operating system different from the one in the computer is to build live distributions installed on a CD/DVD or USB stick. You can see some of these distributions in the link section at the end of this article: Windows 7 32 bit [1], Windows 7 64 bit [2], Windows 8 [3], Windows 8.1 [4], Windows 10 [5], System Tools [6], Parted Magic [7], Parted Magic 2019_01_03 [8]. The disadvantage of this method is that not all software programs can run on a live distribution.
The second easy way to run other operating systems is by using virtual machines, emulators of a real computer. A disadvantage of this method appears if the host operating system crashes. In this case you also cannot run the virtual machines. Often it is better to run applications on real hardware instead of virtual machines or live distributions to can evaluate their true performance and stability.
Version A (XOSL as boot manager)
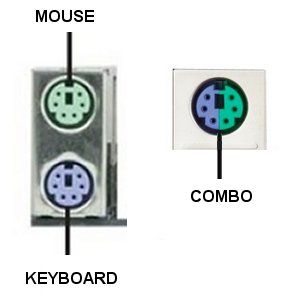
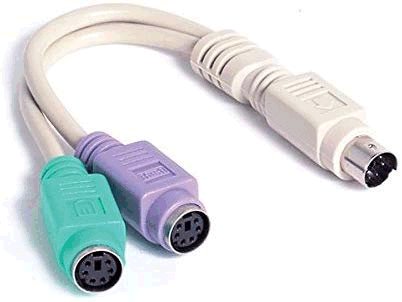
The first multiboot configuration I present here is based on XOSL as boot manager. This configuration was tested by me on many computers of different generations. Theoretically on a single computer it is possible to install a maximum of around 50 operating systems controlled by a single boot manager. As an example, let's see how to setup a configuration with three operating systems: Windows 7, CentOS and DOS on a computer (MBR BIOS) with 9th generation Intel processor codename Coffee Lake [9] and a SSD storage of 240 GB. There are problems because installers for DOS and Windows 7 don't have USB 3.x drivers included. For using DOS you need a motherboard with input ports for PS2 mouse and keyboard (figure 4). If the input port is combo, you need also a PS2 splitter (figure 5). On new UEFI based motherboards, CSM must be enabled. Compatibility Support Module (CSM) is a component of firmware that provides legacy BIOS compatibility on UEFI systems. The PS2 splitter cable does not works on computers without CSM. I have successfully installed this configuration on many computers, including Kaby Lake and Coffee Lake based systems.
|

Figure 4
PS2 ports |

Figure 5
PS2 splitter |

Figure 6
Partitions |
|
In figure 6 you can see the partition layout I use:
- first partition, primary 8 GB , FAT32 for DOS, boot manager and other system tools and programs;
- second partition, primary 40 GB, NTFS for Windows 7;
- third partition, logical 20 GB, ext3 for CentOS;
- fourth partition, logical 4 GB, linux-swap for CentOS;
- fifth partition, logical 150 GB, NTFS for data, this section is seen by both Windows and Linux.
To setup this configuration you need the following software:
- GParted [11] running from USB stick. As an alternative you can use GParted from PartedMagic [7] [8] (always use the latest version) - it is used to make the partitions on internal storage;
- Clonezilla [12] running from USB stick. As an alternative you can use Clonezilla from PartedMagic [7] [8] - it is used to backup / restore the Linux ext3 partition used by CentOS;
- HDHacker [13] or BootIce running from a Windows live distribution [4] [5] - it is used to backup / restore the MBR (master boot record - first sector of disk);
- XOSL-OW 1.1.6 installation kit [10] - there is an instruction manual in the project website;
- DOS installation kit running from FDD, CD or USB;
- Windows 7 installation kit running from DVD or USB;
- drivers for Windows, usually on CD/DVD;
- to install Windows 7 you need a Patcher provided by motherboard manufacturer to inject USB 3.x drivers in the installation kit;
- a backup / restore program running from a Windows live distribution [4] [5] used for Windows NTFS partition;
- CentOS or CentOS Stream installation kit running from USB. Support for CentOS will go away at the end of 2021 and is replaced by CentOS Stream;
- a storage for backups, other than internal partition DATA, usually an USB stick.
The order of operations is as follows:
A. create first partition 8 GB FAT32 for DOS, the rest of internal storage space remains unallocated in this step. After every change in partition layout you must power off the computer;
B. install DOS (fdisk, format, sys);
C. install XOSL-OW and setup first menu in boot manager - DOS;
D. backup MBR with HDHacker;
E. backup DOS partition;
F. create the rest of partitions with GParted;
G. set "hidden" flag on first partition DOS;
H. install Windows operating system, custom on second partition NTFS 40 GB. The MBR will be overwritten during installation by setup program. Install all drivers in Windows. Test if Windows works well;
I. backup Windows partition;
J. restore MBR saved in step D;
K. setup second menu in boot manager - Windows, set "boot" and "hidden" partitions flags correctly (see XOSL-OW instruction manual);
L. backup MBR with HDHacker;
M. install CentOS configured for workstation, choose custom partitioning, /dev/sda5 (20 GB) for root directory and /dev/sda6 (4 GB) for swap. Leave rest of partitions untouched. The MBR will be overwritten during installation. Change Linux boot loader to point on /dev/sda5 (grub2-install, grub2-mkconfig);
N. install ntfs-3g in CentOS 8 to get access on DATA partition;
O. restore MBR saved in step L, setup the third menu in boot manager - Linux. Set in boot manager the partitions flags for hiding DOS partition when running Windows.
P. you can add on DOS partition several portable OS distributions [6] that usually are running from an USB stick. This is the reason I made this partition as large as of 8 GB.
Now you have three operating systems on your computer.
Version B (GRUB as boot manager)
The second multiboot configuration uses Grub2 as boot manager. There are many websites on the internet that describe in detail how to do that. This configuration was tested by me on many computers of different generations. Recently I have installed this type of multi boot on Kaby Lake and Coffee Lake based computers with CSM module for legacy BIOS. This one is easier to install comparing to version A.
To setup this configuration you need the same software as in version A, but the partition layout is different. The order of operations is as follows:
A. create partition layout with GParted as in figure 7 (MBR BIOS type). After change the partition layout you must power off the computer;
B. install Windows 7, custom on first partition NTFS 40 GB;
C. install CentOS, choose custom partitioning, set ext4 partition /dev/sda5 (20 GB) for root directory and /dev/sda6 (4 GB) for swap. Leave rest of partitions untouched. The MBR will be overwritten during installation;
D. usually Linux boot manager will recognize the Windows system and will place an entry in the boot menu list (figure 8);
E. you can plug in USB ports some flash memories with other portable OS distributions and run in Linux "grub2-mkconfig --output=/boot/grub2/grub.cfg" to add them in the boot menu list;
F. Alternatively, you can manually edit the file /etc/grub.d/40_custom to add new entries in boot menu list, then run again step E.
|
|
Figure 7
Partition layout |

Figure 8
Boot menu |
|
Version C
(GRUB, GRUB4DOS and SYSLINUX)
The third multiboot configuration uses Grub as primary boot manager followed by Grub4dos [14] and Syslinux [15]. This will allows you to put in place a more complex multiboot configuration. As an example you can install on a computer (MBR BIOS based) three operating systems as host and several OS as portable systems. I use in this example Windows 7, CentOS Gnome or KDE Desktop (figures 14, 15) and DOS.
To setup this configuration you need the same software as in version A. The partition layout (figure 9) is also similar with the one from version A. The order of operations is as follows:
A. create first partition 8 GB FAT32 for DOS, the rest of internal storage space remains unallocated in this step. After every change in partition layout you must power off the computer;
B. install DOS (fdisk, format, sys);
C. put on first partition at least one portable OS Windows based;
D. complete the rest of partition layout with GParted as in figure 9;
E. install Windows 7, custom on second partition NTFS 40 GB;
F. install CentOS, choose custom partitioning, set ext3 partition /dev/sda5 (20 GB) for root directory and /dev/sda6 (4 GB) for swap. Leave rest of partitions untouched. The MBR will be overwritten during installation;
G. usually Linux boot manager will recognize the Windows system on second partition and the portable OS on first partition and will place the entries in the boot menu list (figure 10). If not, you can manually add them in grub2 as shown in the version B. Even if you have other portable OS on first partition, if DOS is installed there, Grub will boot in DOS if you select /dev/sda1 entry;
H. put in first partition GRUB4DOS and SYSLINUX files and make the menu files for the rest of boot options (figures 11, 12 and 13).
|
|
Figure 9
Partition layout |
Figure 10
Boot menu |

Figure 11
Submenu 1
grub4dos |

Figure 12
Submenu 2
grub4dos |

Figure 13
Submenu 3
syslinux |

Figure 14
Centos7
Gnome |

Figure 15
Centos7 KDE |

Figure 16
Centos8 |
|
Version D
Dual boot Windows 10 and Fedora 33
The fourth multiboot configuration shows a method to install Windows 10 (figure 19) and Fedora 33 Workstation (figure 20) on the same computer with a 240 GB SSD. All modern computers use now UEFI standard for boot and soon it will not be possible to use the methods presented above (versions A, B, C) if the support for legacy BIOS will be dropped in the future. Also the new operating systems use now GPT configurations for partition layout that are different from MBR used in the first three versions presented above.
To setup this configuration you need GParted [11] and installation kits on USB flash memories for Windows 10 and Fedora 33 (RedHat 8, Centos 8). The partition layout is presented in figure 17. The order of operations is as follows:
A. create with GParted two NTFS partitions, more or less with dimensions 80 GB (win) and 100 GB (data). Partition Data is seen by both Windows and Linux. After every change in partition layout you must power off the computer. Leave the rest of the space on SSD unallocated;
B. install Windows 10 custom on first 80 GB NTFS partition. During installation, Windows 10 will automatically create additional partitions with small dimensions in the free space;
C. install Fedora 33 Workstation custom in the rest of the unallocated space. Use "Install to Hard Drive" option. On "Installation destination" section use "Storage Configuration" and select "Automatic" or "Advanced Custom (Blivet-GUI)". Then press "Begin Installation". During installation, Linux also will automatically create additional partitions needed for running;
D. Linux installer will recognize the Windows system and will place automatically the entries in the boot menu list (figure 18).
|
|
Figure 17
Partitions |

Figure 18
Boot menu |

Figure 19
Windows 10 |

Figure 20
Fedora 33 |
|
Version E
Windows 10 and CentOS 8
The fifth multiboot configuration shows a method to install Windows 10 and CentOS 8 Workstation on the same UEFI whithout CSM computer with a 240 GB SSD.
To setup this configuration you need installation kits on USB flash memories for Windows 10 (Win10_20H2_English_x64) and CentOS 8 (CentOS-8.4.2105-x86_64-dvd1). The order of operations is as follows:
A. backup all data from SSD, the partition layout will be changed;
B. install Windows 10 custom. During installation, erase all existing partitions if any and make two NTFS partitions (3 and 4 in figure 21), more or less with dimensions 40 GB (win) and 150 GB (data). Installer will also automatically create partitions 1 and 2 (figure 21). Leave the rest of the space unallocated. Format partitions 3 and 4 as NTFS. Install Windows 10 on NTFS partition 3 (40 GB);
C. install CentOS 8 Workstation custom in the rest of the unallocated space. On "Installation destination" section select "Automatic". Then press "Begin Installation". During installation, Linux will automatically create additional partitions needed for running (figure 22);
D. Linux installer will recognize the Windows system and will place automatically the entries in the boot menu list (figure 23).
|

Figure 21
Windows 10
Installer |

Figure 22
Partition layout |

Figure 23
Boot menu |
|
The same method can be applied for dual boot (figure 24) of Windows 10 version 21H1 (figure 25) and Centos Stream 8 version 20210811 (figures 26 and 27).
|

Figure 24
Boot menu
|

Figure 25
Windows 21H1 |
|

Figure 26
CentOS Stream 8 |

Figure 27
CentOS Stream 8 |

Figure 28
Partition layout |
|
Version F
Windows 11 and CentOS Stream 9
The sixth multiboot configuration shows a method to install Windows 11 and CentOS Stream 9 Workstation on the same UEFI whithout CSM computer with a 240 GB SSD.
To setup this configuration you need installation kits on USB flash memories for Windows 11 (Win11_English_x64v1.iso) and CentOS Stream 9 (CentOS-Stream-9-latest-x86_64-dvd1.iso). The order of operations is as follows:
A. backup all data from SSD, the partition layout will be changed;
B. install Windows 11 custom. During installation, erase all existing partitions if any and make two NTFS partitions (3 and 4 in figure 29), more or less with dimensions 80 GB (win) and 100 GB (data). Installer will also automatically create partitions 1 and 2 (figure 29). Leave the rest of the space unallocated (around 42 GB). Format partitions 3 and 4 as NTFS. Install Windows 11 (figure 31) on NTFS partition 3 (Win 11 - 80 GB);
C. install CentOS Stream 9 Workstation (figure 32) custom in the rest of the unallocated space. On "Installation destination" section select "Automatic". Then press "Begin Installation". During installation, Linux will automatically create additional partitions needed for running (figure 29);
D. Linux installer will recognize the Windows system and will place automatically the entries in the boot menu list (figure 30).
|

Figure 29
Partitions |

Figure 30
Boot menu |

Figure 31
Windows 11 |

Figure 32
CentOS Stream 9 |
|
Note: This project is for people who have extensive knowledge of computer hardware and software. Changing the partition layout of an internal data storage will erase all data without possibility of recovering. The operations presented here must be performed on a new HDD/SSD or if it is an old one, you must backup all data before making the new configuration.
Disclaimer: The information on this web site is provided "AS IS", without warranty of any kind.
The author has made the best efforts to ensure the design and the information provided are reliable.
Under no circumstances shall the author be liable for any direct, indirect, incidental, special
or consequential loss, damage, expense or injury incurred or suffered which is claimed
to resulted from use of this site, even if expressly advised of the possibility of
such loss, damage, expense or injury,
including, without limitation, any fault, error, omission, interruption or delay with respect thereto.
Links:
[1] - Windows 7 32 bit Portable Edition
[2] - Windows 7 64 bit Portable Edition
[3] - Windows 8 Portable Edition
[4] - Windows 8.1 Portable Edition
[5] - Windows 10 Portable Edition
[6] - System Tools
[7] - Parted Magic
[8] - Parted Magic 2019_01_03
[9] - Intel processors
[10] - XOSL-OW 1.1.6
[11] - GNOME Partition Editor
[12] - Clonezilla
[13] - HD Hacker
[14] - Grub4dos
[15] - Syslinux
|
|
|